Might this just be the poor mans vRA for server builds?
In this post I will show you how to build an Azure Devops Pipeline to automatically deploy Windows Server SOE’s (Standard Operating Environment) onto vSphere using Azure Devops Agents, Ansible on Ubuntu 22.04 and a Powershell host for all the custom stuff we don’t have community or native Ansible modules for.
The way I structure the SOE’s is with a layered configuration, this allows me to use the same Pre, Layer 0 and 1 for all core components, only changing Layer 2 and POST as required for “Optional” components such as Web servers, SQL servers, etc…

PRE LAYER performs all the checks before the build is permitted to start and will seed the dependencies. This prevents human error as there is always a risk of someone trying to build a server which already exists / using an IP address that’s already in use. When all checks pass is will prepare the dependencies such as the AD computer account, any new AD groups that need to be created and DNS entries.
LAYER 0 is the OS deployment via VMware vSphere / Microsoft Virtual Machine Manager / KVM and Ansible / PowerShell Hosts.
LAYER 1 is used to add AD groups to the local server Administrator / Remote Desktop Users group(s), request server certificates from the Windows Certificate Authority, configure WinRM, Install and configure management and monitoring agents such as BMC BladeLogic, Microsoft SCCM, BMC Patrol, Microsoft SCOM, etc.
LAYER 2 is reserved for optional components such as SQL Server, Remote Desktop Services / Gateways, IIS Web Services and more.
LAYER POST these layer’s will typically perform actions against Active Directory / DNS / management and monitoring systems once the build is complete, the actions will typically depend on which Pipeline (Layer 2) has been executed. For example if we are deploying a webserver its configuration will not need the same components as a SQL server… extra certs, DNS entries, removing it from the domain, etc…
Dependencies
Active Directory
- A domain account with Domain Join permissions to a specific OU, I like to create a “Provisioning” OU to limit the access this account has, once the server has been completed I move the Computer Account into another OU.
VMware vSphere
- An account with vCenter access to provision VM’s / view templates.
- VM / Template folder called VMPROVISIONING
Windows Certificate Authority (Optional, Remove step from Layer1 and Layer2 YML files if desired)
- With a Auto Enroll certificate Template called WINRM, this is so we can secure WINRM at the end of the build.
vRealize Operations / Aria Operations (Optional, Remove job Run_vMANW_vRops_Post and update the dependency on job Run_vMANW_Post from vmanw-generic-server-automation.yml)
- vRops account with API / Role as described in this post
Setup
Now that we have covered what it will look like, lets get to the step by step how to.
1). VMware Template
vSphere Template with Windows 2019, 2022 Core &/or GUI, the name of the template will be required later when creating the variable vcenter_template in variable group vmanw
I am not going to explain how to create Windows vSphere template as there are plenty of resources out on the web, just like you found this post… find one on vSphere VM Templates.
Just make sure that Enable-PSRemoting has been executed and that all windows firewalls are all disabled on the VM before it’s converted to a template.
2). Azure Devops Agent Pools
Create 2 New Agent Pool’s in DevOps, one for Windows and another for Ansible

3). Servers & Software
We will need a minimum of 1 windows and 1 linux server with the following software installed, these will run the azure agents and software required to deploy and configure the SOE builds. If you plan to scale out deploy more of these servers or deploy multiple Azure Agents in containers on these servers.
Ubuntu 20.04 Server (Ansible Server)
2 vCPU’s
2GB of RAM
20GB of Disk (depending on your software / optional components you might want to make this much larger)
Software
- Install and configure the Azure Agent (Add to Ansible Agent Pool)
- sudo apt install -y software-properties-common
- sudo apt-get install -y python3-pip
- sudo pip3 install pyVim
- sudo pip3 install PyVmomi
- sudo pip install pywinrm
- sudo pip install pywinrm[credssp]
- sudo pip install netaddr
- sudo pip install jinja2
- sudo pip install ansible
- sudo pip install requests
After adding the agent to the pool it should show as online

Download PsExec and upload it to the Ansible server under: /home/vman/ansible/resources/layer1/psexec/2.40/PsExec.exe remember to change the version in vmanw-layer-1.yml if you don’t use 2.40
Download sysmon and upload it to the Ansible server under: /home/vman/ansible/resources/layer1/sysmon/14.1 remember to change the version in vmanw-layer-1.yml if you don’t use 14.1
Download BGInfo and upload it to the Ansible server under: /home/vman/ansible/resources/layer1/bginfo/4.32/Bginfo.exe remember to change the version in vmanw-layer-1.yml if you don’t use 4.32
NOTE: The path will be case sensitive
Windows 2022 (Powershell Host)
2 vCPU’s
4GB of RAM
20GB of disk (depending on your software / optional components you might want to make this much larger)
Software
- Install the RSAT-AD-PowerShell feature
- Install the RSAT-DNS-Server feature
- Install and configure the Azure Agent (Run as a service account with the ability to create Computer accounts in AD, Add to Powershell Agent Pool)
After adding the agent to the pool it should show as online

4). Azure Devops Variable Groups
In this post I will cover 3 variable groups and the variables that are required for this example to work, just make sure to fill in your own value’s but keep the name’s the same.


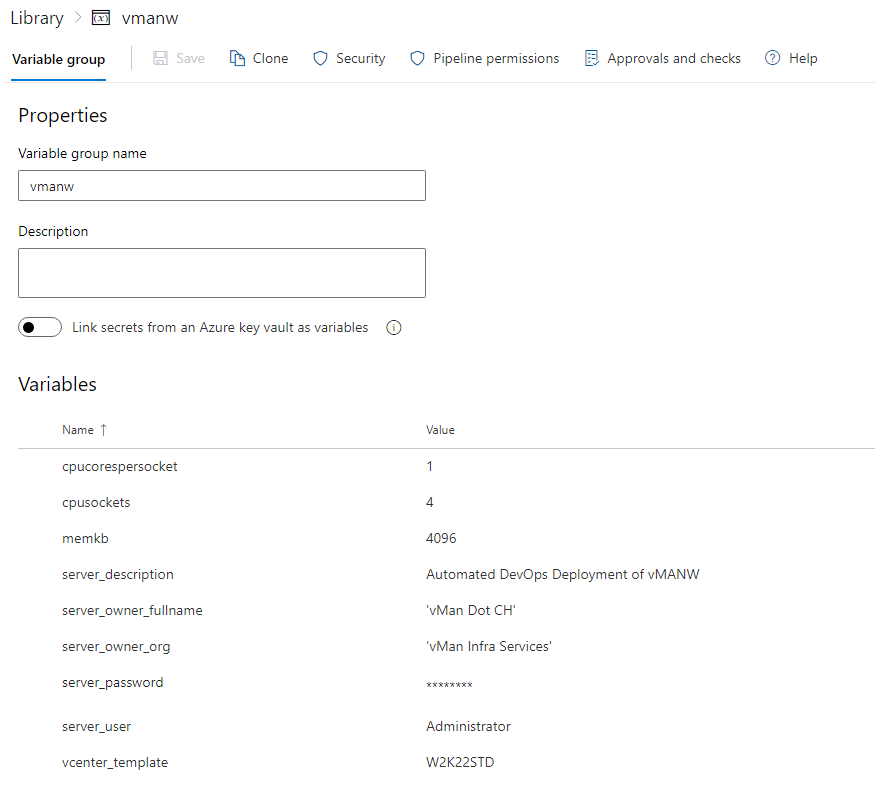
Adding additional variable groups will allow you to have more stages IE: variations, locations and deployment options as you just have to switch around the Agent Pools / Variable groups.
5). Azure Devops Repo
Make sure to clone this repo to your own Azure Devops SOE repo

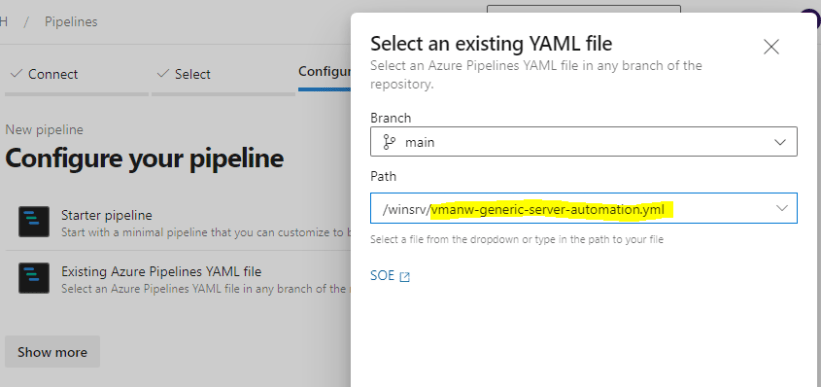
6). Azure Devops Pipeline
To create the pipeline click the New Pipeline button

Select Azure Repos Git


Select “Existing Azure Pipeline YAML file” from step 5

On the pipeline create the new variables which will be required at runtime, see further down in the post for the names.


Add the new variables, don’t forget to “Let users override this value when running this pipeline”, create all the variables and give examples as below.
- server_name (VM/server name)
- server_ip (Server IP address)
- server_gw (Gateway the server will use)
- server_mask (Subnet mask)
- vcenter_pg (vSS or vDS Portgroup Name)

Click the drop down and click “Save”

Now under the pipelines the new one should appear, click on it, then once its loaded, click “Run Pipeline“


1st step is to fill in the variables, enter all the details for the new VM


2nd step is to select the “Stage to run”, in this example I want to deploy a W2K22 server, not the W2K22 CORE version so I will select the first one.

Now click RUN

So this is the exciting part, we get to drink coffee while the pipeline does it thing and we pretend to work, you should be able to monitor the pipeline run and also check and vCenter to monitor the progress / status.

As you can see below the VM has been created in the VMPROVISIONING folder within the HZ Datacenter, HZ-CL01 Cluster on the vSAN-CL-01 datastore.


If the pipeline fails at any step

Review the error in the pipeline run and try to determine if its an environmental issue (firewall) or access issue (domain join, vCenter access, etc…).

If you need to update a variable, delete a computer account or fix a firewall rule… just update it and then click “Rerun failed jobs” so that it can continue from where it left off.
As you can see below we have a completed run that is all green!

Once the pipeline has completed, go to the beach! Make sure to tell your boss that you spent hours building a server (I do not condone such lies, naughty person), and party like it was 1999!
And there you have it, a repeatable method to build windows servers! I have included an example for a IIS web server, just make sure to create a new pipeline and point it to the vmanw-web-server-automation.yml file & create and additional variable groups you might need.
I hope you found this helpful
vMan
Recent Comments